WordPress Integration
With the WordPress integration, you can publish your blog articles from Christiani.AI straight to your own WordPress site. You decide whether the article is saved as a draft, published immediately, or scheduled for a later date. You also set the featured image, the categories, and the URL slug right inside Christiani.AI. Afterwards, you can see the publishing status directly in your blog overview, including a link to the finished post.
What you need before you start:
Your own WordPress site (self-hosted) or a WordPress.com site
Your site is accessible via HTTPS
WordPress version 5.6 or newer (required for application passwords)
Pretty permalinks are enabled (in WordPress under Settings › Permalinks)
Your WordPress user has at least the Author role
Connecting WordPress
There are two ways to reach the "Connect WordPress" dialog. Both lead to the same place:
Option 1: Through your profile
Open your user profile settings.
Go to the "Integrations" section.
Click the WordPress card.
Option 2: Directly while publishing
Open a blog article and click "Publish".
If no connection exists yet, an info card appears in the drawer.
Click the "Connect WordPress" button there.
Fill in these fields in the dialog:
Choose your site type: self hosted or WordPress.com.
Enter the full URL under "Your site address", for example https://your-site.com. Important: the site must be accessible via HTTPS.
Enter your "WordPress username". This is your WordPress login name, not your email address.
Paste your "application password". Note: this is not your regular login password. You'll learn how to create one in a moment.
Click "Connect and verify". Christiani.AI tests your credentials right away. If everything works, the name of your site appears.
How to create your application password in WordPress:
Log in to wp-admin. Use the user account the credentials should belong to, or an admin account that can edit that user.
Open Users › Profile. Alternatively, go through Users › All Users › Edit.
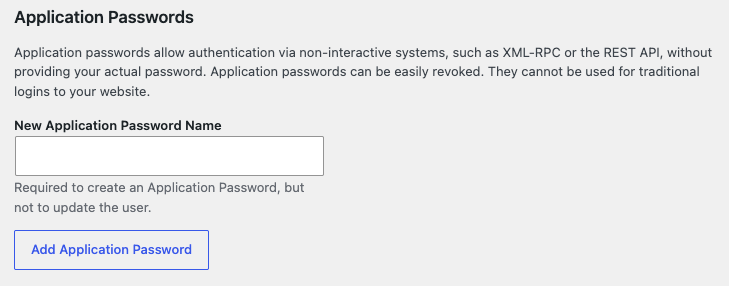
Find the "Application Passwords" section.
Give it a meaningful name, for example "Christiani.AI".
Generate the password and copy it immediately. It won't be shown again afterwards.
Tip: WordPress displays the password in blocks separated by spaces. It works with or without the spaces, so there's no need to remove them.
Security note: Your application password is stored encrypted. You can revoke it individually in WordPress at any time without changing your own login password.
Publishing a Blog Article
Create a blog article with the Blog Article Creator or open an existing one from your overview.
Click "Publish" in the top right corner. The WordPress drawer opens.
Choose your mode:
"Save as draft": The article lands in WordPress as a draft. You review and publish it yourself later.
"Publish now": The article goes live immediately.
"Schedule": Pick a date and time, and WordPress publishes the article automatically.
Optionally adjust the slug. That's the URL ending of your post. If you leave the field empty, the slug is generated automatically from the title.
Select your categories. The list is loaded live from your connected WordPress site.
Choose a featured image: either from your own media library or generated by AI in 16:9 format. The image is uploaded to your WordPress media library and set as the featured image.
Send the article. Christiani.AI then shows you the status and a link to the post in WordPress.
Good to know: The excerpt of your post is automatically taken from your article's meta description.
Updating instead of duplicating
Did you revise your article after sending it? Just send it again. The button now reads "Update post"; with several blogs, it names the blog. Christiani.AI updates the same post in WordPress, so no duplicate is created.
Keeping an eye on the status
In your blog overview, a line appears below the status field showing WordPress and the publishing or scheduling date. This line links directly to your post.
Common Error Messages
"The site cannot be reached. Check the URL and make sure the site runs on HTTPS."
Cause: The address contains a typo, the site is currently offline, or it only runs on http instead of https.
Solution: Check the URL for typos and open the site in your browser. Make sure the address starts with https://. If your site doesn't have HTTPS yet, set up an SSL certificate first. Your hosting provider can help you with this.
"The REST API did not return JSON. In WordPress, enable pretty permalinks under Settings › Permalinks."
Cause: Your WordPress site still uses the default (plain) permalinks.
Solution: Log in to wp-admin, open Settings › Permalinks, and choose a pretty permalink structure, for example "Post name". Save the setting and connect again.
"The WordPress REST API cannot be reached at this address. Check the URL and the permalink settings."
Cause: In most cases, a security plugin or a firewall is blocking the /wp-json path on your site.
Solution: First check the URL and the permalinks. If that doesn't help, look into your security plugin settings and allow access to the REST API, or ask your hosting provider about firewall rules.
"Username or application password is incorrect."
Cause: A typo in the credentials, you entered your email address instead of your username, or the application password was revoked in WordPress.
Solution: Double-check your WordPress username (not your email address) and, if in doubt, create a new application password.
"Login rejected. Use an application password (not your regular password)."
Cause: You entered your regular login password.
Solution: Create an application password as described in Part 1 and use it for the connection.
"This user does not have permission. The user needs at least the Author role."
Cause: Your WordPress user has a role that's too limited, for example Contributor or Subscriber.
Solution: Ask an admin to assign you the Author role or higher, or use a user account with sufficient permissions.
Connecting and Managing Several Blogs
Connecting several blogs
You can connect up to 10 WordPress blogs per business account. Open your user profile settings, go to the "Integrations" section and click "Add another blog" on the WordPress card. Each blog needs its own application password.
One of your blogs is your default blog. You can change it from the blog's menu with "Set as default".
Which blog does your article go to?
Once you have connected at least two blogs, you choose the blog at the top of the WordPress drawer. The blog you last sent this article to is preselected, otherwise your default blog. If you send the same article to a second blog, a separate post is created there.
Updating your credentials
Open the blog's menu on the WordPress card and click "Edit".
Enter your new application password. If you leave the field empty, the current password stays in place.
A blog's address can't be changed. For a different address, add a new blog.
Disconnecting
Open the blog's menu on the WordPress card.
Click "Disconnect" and confirm.
Your posts stay in WordPress and scheduled posts still go out, but Christiani.AI can no longer update them.
Important for teams: The connections apply to your business account, not to individual users. All team members of the same account can publish to all connected blogs.
Note: If you revoke the application password in WordPress, publishing from Christiani.AI will fail. In that case, reconnect with a new application password.
Related Features
Blog Article Creator: This is where you create the articles you then publish to WordPress.
Content Planner: Plan your blog topics ahead of time and keep track of your editorial calendar.
Content Multiplier: Turn your published blog article into additional formats for your other channels.
Social Media Post Creator: Promote your new blog post with matching posts on LinkedIn, Instagram, Facebook, and Twitter/X.
Image Library: Manage the images you want to use as featured images here.
Was this helpful?
Still need help? Share an idea